Description
Moving your website to a new domain
Moving a WordPress site to a new domain is a bit more involved than a static site because of the database and WordPress configuration. Here’s a step-by-step guide to help you migrate your WordPress site to a new domain smoothly:
1. Prepare the New Domain and Hosting
- Purchase the new domain and ensure your hosting is set up.
- Make sure the new domain is fully configured (DNS settings, email, and SSL certificates).
- If you’re staying on the same hosting account, you might just need to add the new domain as an add-on domain or a new site.
2. Backup Your Current WordPress Site
- Backup all WordPress files: Use an FTP client (like FileZilla) to download all your WordPress files.
- Backup the WordPress database: Go to your hosting control panel (e.g., cPanel) and use phpMyAdmin to export your database.
- Alternatively, use a WordPress plugin like UpdraftPlus or Duplicator to back up the entire site, including the database and files.
3. Move Files to the New Domain
- Upload WordPress files to the new domain’s hosting account using FTP or your host’s file manager.
- If you’re using a plugin like Duplicator, simply follow its restoration process to move the files.
4. Create a New Database on the New Domain
- In the hosting control panel for the new domain, create a new MySQL database.
- Import the database backup you exported earlier (via phpMyAdmin) into the new database.
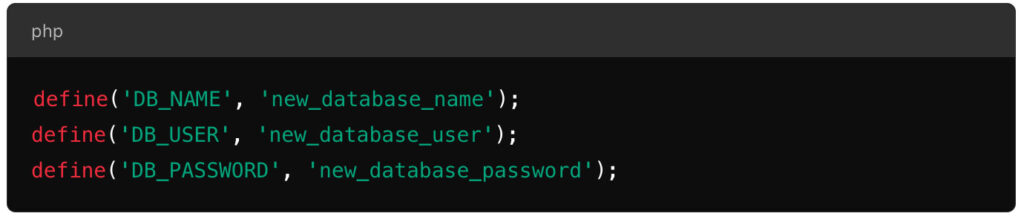
5. Update the wp-config.php File
- In the wp-config.php file on your new domain, update the database details to match the new domain’s database. Change the following lines to reflect the new database name, username, and password:
6. Search and Replace Old Domain in the Database
WordPress stores the old domain in the database, so you need to replace it with the new domain.
Use a plugin like Better Search Replace or a tool like WP-CLI to search for instances of the old domain in the database and replace them with the new domain.
For Better Search Replace, after installing it:
- Go to Tools > Better Search Replace.
- In “Search for,” enter your old domain (e.g.,
old-domain.com). - In “Replace with,” enter the new domain (e.g.,
new-domain.com). - Select all tables and run the search and replace.
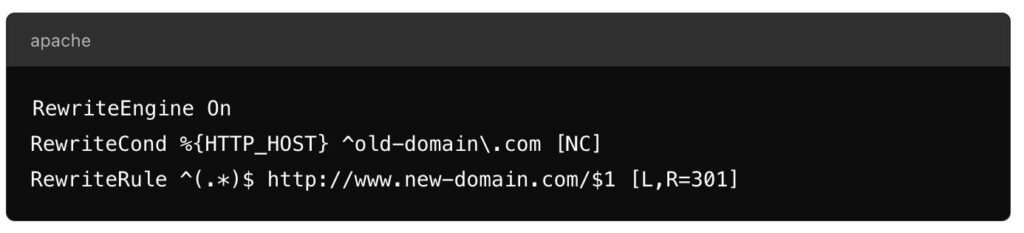
7. Set Up 301 Redirects on the Old Domain
- Redirect all traffic from the old domain to the new domain using 301 redirects to maintain SEO rankings.
- If you still control the old domain, modify the
.htaccessfile to add the following redirect rule:
You can also use a plugin like Redirection to manage redirects from the old URLs to the new ones.
8. Update WordPress and Site URL Settings
- Log in to your WordPress admin dashboard on the new domain.
- Go to Settings > General and make sure the “WordPress Address (URL)” and “Site Address (URL)” fields are updated with the new domain URL.
9. Update Permalinks
- After logging into your new site, go to Settings > Permalinks and click “Save Changes” to ensure the URL structure is correct and that links are updated properly.
10. Notify Google Search Console
- Add the new domain to Google Search Console.
- Use the Change of Address tool to inform Google about the domain move.
- Submit your new sitemap (you can generate one using a plugin like Yoast SEO or All in One SEO Pack).
11. Update Internal Links and Media Files
- While the search and replace should have updated most links, some plugins or widgets might still contain hardcoded links to the old domain.
- Use a plugin like Velvet Blues Update URLs or Go Live Update URLS to ensure all internal links and images point to the new domain.
12. Test the New Site
- Thoroughly test the new domain to ensure all links, media, and functionalities are working properly.
- Check for broken links, missing images, and any other errors.
13. Monitor Traffic and SEO
- Track your traffic using Google Analytics and Google Search Console.
- It’s normal to see a temporary drop in traffic after the move, but it should stabilize once search engines re-index the new domain.
14. Update Social Media and External Links
- Update your social media profiles, email signatures, and any online listings with the new domain name.
- If possible, reach out to websites that link to your old domain and ask them to update their links to the new domain.
Additional Tips
- Keep the old domain for a while and keep the 301 redirects active for at least 6-12 months to ensure the transition goes smoothly for users and search engines.
- Communicate with your audience about the domain change to avoid confusion, especially if you have regular visitors or a customer base.
By following these steps, you can successfully move your WordPress site to a new domain while minimizing downtime, SEO impact, and user disruption.
